

Cannabis flowering is undeniably the most exciting stage of growing marijuana plants indoors. During this phase, the plant produces the buds/colas with sticky and smelly trichomes containing various cannabinoids, such as THC – the key psychoactive compound responsible for making that signature ‘high’. What do you need to know when growing your cannabis during this stage? We will try to explain it in a simple and easy-to-understand guide.
What is the cannabis flowering stage?
When your indoor light cycle provides your plants with 12 hours of uninterrupted light, they enter what’s called the flowering stage. Once this stage begins, you will notice that your plants’ growth will slow down significantly – but don’t worry, this is entirely normal and just temporary for a couple of days. For the next 3-4 weeks, plants will continue to grow rapidly and, later on, will slow down. This happens because the plants start to divert all their energy toward the flowering – development of buds. This phase lasts anywhere between 8 and 11 weeks for most strains.
Interesting fact: the Indica strains or Indica-dominant strains typically flower a lot quicker than their Sativa counterparts. Many strains are the mix between Sativa and Indica, so more specific flowering times depend on the strain itself.
Cannabis flowering stage week-by-week
The cannabis flowering stage “walkthrough” below will help you understand what happens on a week-by-week basis as you excitedly watch your marijuana plant produce high-quality buds. It will also explain what you must do to ensure that your harvest yields the best quality bud possible.
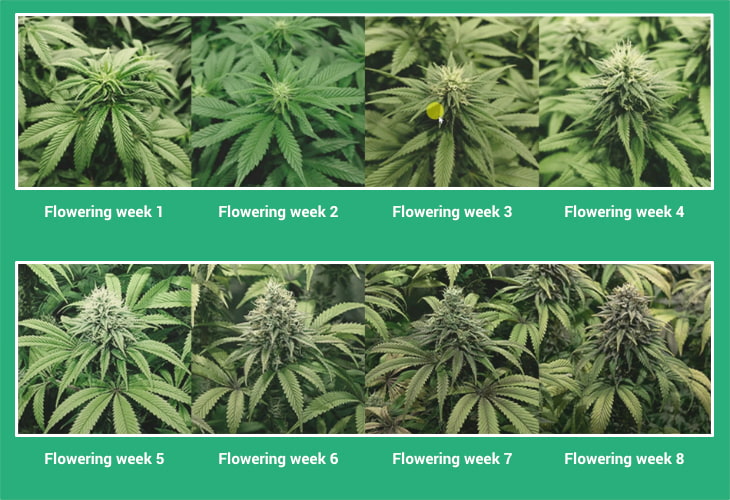
Week 1 to 3
When growing cannabis indoors, the flowering stage will kick in when you switch your grow lights to a 12/12 cycle – meaning 12 hours of light followed by 12 hours of darkness per day. They “believe” that winter is arriving because the days are getting shorter. It’s worth noting that auto-flowering strains do not require special light cycles to start flowering – even then, this walkthrough can be used as a good reference point for a broad range of strains.
During the dark phase, make sure your plants are shrouded in 100% uninterrupted darkness, otherwise, the cycle will be damaged, and plants stressed. Nothing tragic will happen if, by accident, the lights go off for a short time (in nature, sometimes we get a solar eclipse too). But during the nighttime, any light can cause severe damage to the plant’s health.
After switching your plants to a 12/12 cycle, you will notice continuous rapid growth a few days later. Marijuana plants can even grow twice their size once exposed to a 12/12 grow cycle. This is why many experts call this period the “flowering stretch”.
During weeks 1-3, you will see plants producing lovely, intricate new stems and leaves. Plants are still quite resilient at this stage, so they should be able to handle any problems, just like they did in the vegetative stage. But that doesn’t mean you slack it and stop taking great care of them – that’s still very important.
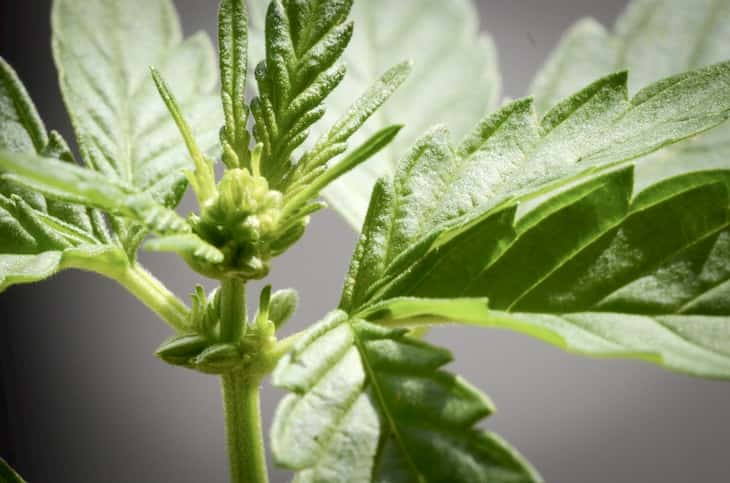
Male and female plants will exhibit distinct traits. For instance, even though male plants will start showing generous amounts of white pistils, they won’t really start growing actual buds with substance. And as you may be aware, only female plants are capable of producing buds.
Prepare to spot male plants
As for male plants, from the 3rd – 4th week, you will start to see them grow easily identifiable pollen sacs. As soon as you found any, better remove them immediately from the grow room. Otherwise, from the second half of the flowering stage, they will easily pollinate the female plants and cause them to produce ‘seedy’ buds, and it’s something you don’t want in any case. You don’t have to worry about if you are growing not from seeds but from clones instead.
Low-stress training
At this point, you may want to spread the plants out under the light – you should gently bend the stretching stems, pulling them down and away from the plant’s center. This will help maintain a flat canopy, aka. ‘low-stress training’. If you are using a net, you can try spreading branches to the different squares of the net. You may even try to bend the longest branches around the net to make all the branches in similar height. This will help to spread the light equally, and the result will talk for itself. It’s possible to do only while the stems are still new during the first four weeks of flowering. Because they tend to harden up and turn woody fairly quickly. The low-stress technique is impossible to learn during one entire cycle, but after a couple of yields, you will master it.
The optimal air temperature is around 77-80°F (25-27°C), and the humidity is between 65-70% during the first 3 weeks of flowering.
Weeks 3 to 4
The almost ‘out of control’ stretching seen in the first few weeks will now start to slow down, but that doesn’t mean your plants will stop growing taller. They will, but much much slower. Soon, you’ll start to notice real buds – many growers like to call them ‘budlets’, during which the pistils with stigmas will be completely white and sticking straight out.
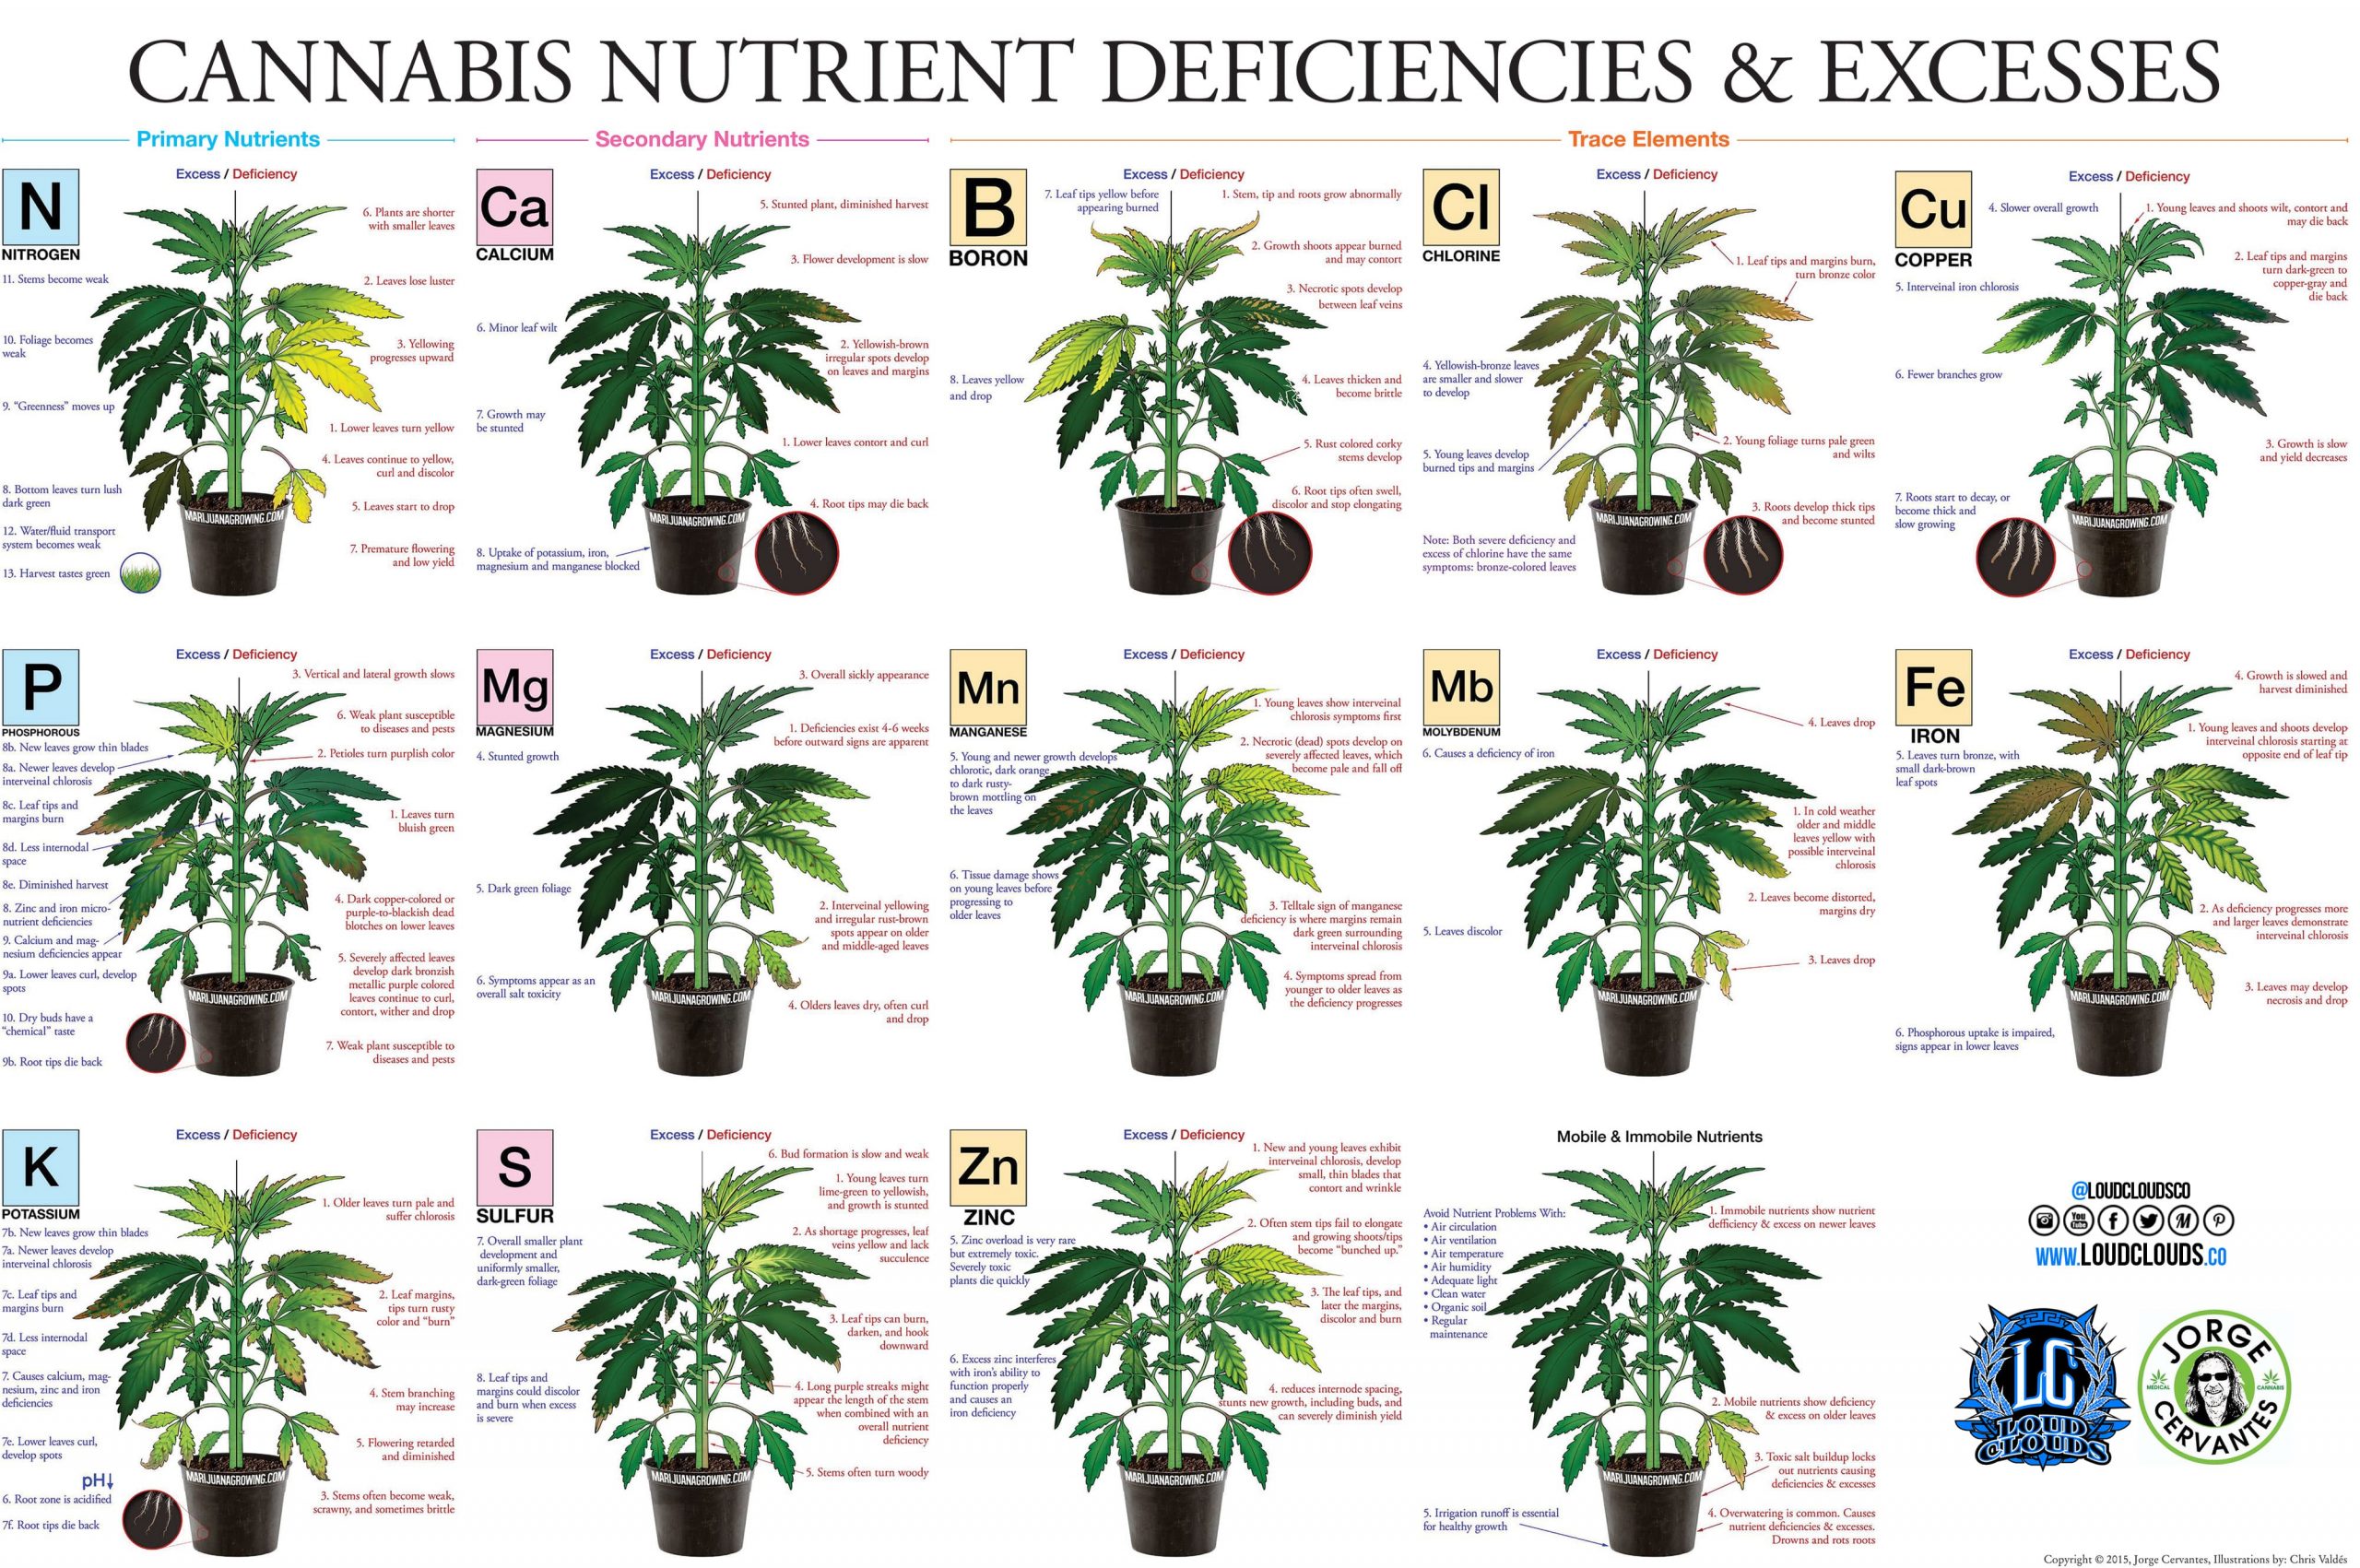
Weeks 3-4 is a critical time because you need to pay extra attention to your plant’s environment and nutrients. Any major plant health problems at this cannabis flowering stage can’t be afforded. Watch out for leaf symptoms – yellow or burned, discolored leaves. Plants should look green and bushy. Of course, it is completely okay if you find few yellow leaves somewhere at the bottom here and there. Especially if those leaves were not getting a whole lot of consistent light, which may lead you to believe that they’re nutritionally deprived, but in reality, it’s just the plant cannibalizing its leaves since it’s not getting exposed to light the way it was earlier. But if have lots of yellow leaves at the bottom of the plants may be the most common problem – Nitrogen deficiency.
The crucial thing is to pay attention to the new leaves at the top side of the plant. If those leaves are damaged in any way, it means that the plants are under stress, and you need to find out the reasons quickly. One of the most common mistakes rookie growers make is over-feeding their plants with too much nutrients. A direct symptom of this is the leaves’ tips getting burned. If you’ve mistakenly overfed your plants a little bit, that should be fine, but avoid this practice as much as you can. Parts of the plants’ leaves lost to nutrient burn will not grow back or recover – eventually, the burning will begin to climb up to the leaves’ fingers. The only cure for heavy overfeeding is flushing the medium with 0.4 EC (around 400 ppm) water and correct pH (6.0-6.5). The product called Enzyme (many fertilizer companies have one, for example, Canna has Cannazyme) used during feeding helps to get rid of old/damaged roots and clean the soil from excessive amounts of salts.
Weeks 4 to 6
Your budlets are now looking fuller and rounder. Soon, you’ll have plump buds which boast a lot of substance! You will notice that nearly all the white pistils are now sticking straight out in every direction, although the buds will continue to get plumper with each passing day.
By weeks 4-6 of the cannabis flowering stage, the flowering stretch is nearly over, which means you’ll no longer have to train your plant. So, rather than keeping those colas down, now going to do the opposite. Hold any buds up which may be getting too heavy for the plant to bear. That’s when the net starts to be beneficial.
Plants need to be at a safe distance from the growing lights. If the plant has grown tall enough to reach critical levels where it might get burnt, you have two options. One will be to adjust the height of the lights if you have some space left. But if it’s only one or few colas out of more, you will lose efficiency on other colas which are in the proper distance. Another option is to try the super-cropping technique, where the stems are forced to bend 90° angle. However, this should never be done late in the flowering stage unless there is no other option.
The optimal air temperature is around 77-80°F (25-27°C), and the humidity is between 60-65%.
Strategic defoliation
No one wants too leafy plants in this stage when you want all buds to receive enough light. This is where strategic defoliation comes in and a technique pro growers use to help expose bud sites.
While defoliation effectively exposes more bud sites, your plant needs to have enough armor (leaves) to last right up to the end of the cannabis flowering stage. So take only those fan leaves that are really blocking the light for a lower bud, or the leaf is already damaged. Usually, taking off few leaves from one plant will not cause any significant stress or harm in any way. But if you cross the line, the plant will stress out and might stagnate for a couple of days or even longer.
Weeks 6 to 8
From this stage of cannabis flowering, your plant will no longer produce new stems or leaves, the growth is ‘fully off,’ and all the plant’s energy will be geared towards growing buds until harvest. You should see them growing significantly in size over the next few weeks.
You’ll notice that some of the leaves at the plants’ base are turning yellow – this is normal because the plants diverted all their energy into the buds. But still, in the ideal conditions, most of the plants should look lush green from top to bottom.
Caring for your plant is more important than ever at this point as it’s going to be extra sensitive and picky toward nutrient problems, including those which arise due to the incorrect pH balance at the root level. The recommended feeding pH is between 6.0 – 6.5 during the whole flowering stage. Usually, the soil gets more acidic due to uneaten nutrients and salts. To compensate for it, many growers increase the pH weekly during feeding until they reach 6.5 in the last weeks until harvest.
If you notice that too many plants leaves are turning yellow during this cannabis flowering stage, it is typically a sign of the grow-light burn, nutrient problems, or wrong pH. Sometimes even the whole grow room can go yellow with only a few leaves still green. In most cases, it’s a pH problem and over feeding. Check the soil pH. If it’s significantly lower than 6, for the next feedings, increase your pH to compensate for it (but don’t make it higher than 6.5). You can still get a decent yield even if all the leaves turn yellow.
Cannabis ‘foxtails’ problem

If you see a new “spire” sprouting out from the side of an old bud that has fully matured – this is a sign of light or heat damage. Excessive levels of heat or light can also cause not only bleaching, or discoloration in your buds, but so-called “foxtailing”, when bud’s calyxes do not stick together. Basically, the bud never gets hard and grows lots of tails – spreads out in all directions. Therefore, immediately control your light height and temperature levels to prevent more damage if you see any such signs. Sometimes low-level foxtailing might be a genetic thing, and it’s nothing wrong with it.
Importance of humidity levels
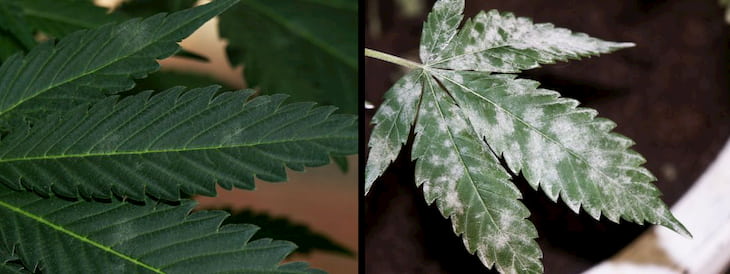
During the first six weeks of flowering, many growers keep air humidity levels up 70%. Plants love it – they grow bushier. But higher humidity increases the risk of powdery mildew. It is caused by the fungus and can be spot on both sides of the leaves, covering them with significant white areas. To avoid getting it and spreading it’s very important to have good air circulation around the plants.
From the 7th week, buds are getting bigger every day and later on start to evaporate a lot of humidity from themself. During the vegetative stage and first weeks of flowering, a humidifier was needed to keep humidity higher. Now you can notice that it naturally gets higher, especially if you are using only LED lights, which do not dry the air like HPS. Sometimes growers use a mix of both types of lights to help fight the humidity. It is vital now to keep the moisture as low as possible to avoid powdery mildew, bud rot and not harm trichomes, which don’t like high humidity levels.
The optimal air temperature is around 77-80°F (25-27°C), and the humidity is below 55%, ideally around 45%. During the first half of the flowering stage, many growers try to keep the air temperature closer to 80°F (27°C). But from the second half of this growth phase, especially from the 7th – 8th week, gradually lower to 77°F (25°C).
Also, during the last week of flowering, many growers significantly increase the day and night temperature difference, sometimes even up to 50°F (10°C). For example, if the daytime temperature is around 77°F (25°C), so they are lowering night-time temperature up to 61°F (16°C).
Week 8 and above
This is the time to treat your plant like a rock star and tend closely to all its needs. Even though many strains are not ready for harvesting before week 8, we’ve arrived at a point in the cannabis flowering stage where many certain strains are practically harvest-ready.
You may want to start a final flush: giving your plants just water (0.4 EC or around 300 ppm and pH between 6.2-6.5). Many growers using rainwater do it for a week before harvest. If you have availability, you can even give an excessive amount of water to get around 0.5 gallons (2l) or more of runoff water.
You’ll notice that by week 8, the buds tend to fatten up really quickly! Trichomes and pistils are reaching full maturity during the last weeks. Now you have to maintain the plant and watch the buds, pistils, trichomes, and the entire plant on the whole for signs of ‘harvest ready’.
Close to week 9-10, you will see the buds attain their full glory, and a sure way to know this is that distinct cannabis smell – it’s going to be downright overpowering!

Some strains may show rapidly yellowing leaves, which is completely okay. Some growers make the mistake of increasing nutrient levels at this cannabis flowering stage. Don’t. It won’t stop leaves from turning all yellow, and in fact, it may even prevent your buds from getting fatter.
In some cases, you may want to harvest your plant early, in case the buds look burnt or discolored – that’s a sign of poor health. So, as a general rule of thumb, if your buds are fully ‘done and you’re just starting to see the leaf symptoms progressively get worse, it’s a good idea to harvest early to have the best yield under the circumstances.
However, it’s easy to make mistakes by harvesting too early. Our next guide will cover the cannabis harvesting and drying process.
Final thoughts
The cannabis flowering stage is the final, very important, and probably the most exciting phase. But many growers will admit that it’s only 60% of the whole process, and the last 40% is harvesting and properly drying your cannabis yield. If you did everything perfectly during the entire growing process, you might easily ruin it during drying. So don’t forget to read our following guide about harvesting and drying cannabis.
Frequently Asked Questions (FAQs)
What is the optimal water temperature for cannabis plants?
During all cannabis growth phases, the recommended water temperature is around 70-75°F (21-24°C). If you keep the air temperature at 77°F, then use water – 70°F.
What causes bud rot?
Bud rot is a mold that usually starts inside the cores of cannabis buds and later spreads outward. The main conditions that allow mold to thrive are:
- Very high humidity (75% <).
- Poor ventilation (lack of new airflow around the plants).
- Weak immune systems in plants.
The best way to fight bud rot is to keep the humidity at proper levels during every cannabis growth stage and proper pruning too bushy cannabis parts where several plants block the airflow. What helps to dry the air? Dehumidifier, air conditioning unit, HPS lights, and proper air extraction system.
Can I prune cannabis in the flowering stage?
In theory, everyone will say the same – that it’s not recommended. Only taking off a small number of fan leaves is advisable during the flowering stage. But practically, growers are facing one problem: they prune the cannabis week before switching to flowering, and after a couple of weeks during this stage, their plants are too much bushy again.
Therefore, many growers split the pruning into couple of stages. They do toppings, and the first phase of the lower branches removing in the vegetative stage. And, on the end of the second week in flowering, while buds are not visible yet, they again clean some unneeded branches and do lollipopings. And only on the 5th or 6th week they remove those fan leaves that are blocking the light or are yellow and damaged on the bottom of the plants.
There is no right answer for it. The main thing growers challenge is don’t cause too much stress on the plant. As long as you manage to deal with it, you can experiment with many different techniques of growing.
